
Tumblr Now Accepting Large Images In Text Posts
A quick(ish) method of adding large photos to Tumblr Text Posts is something I’ve been grappling with for a while. Tumblr Text Posts are not really designed for images, and by default, if you upload photos directly to them, your pics will be resized to a maximum width of 500 pixels.
Tumblr’s answer of course would be to use Photo Posts, which do allow images of up to 1280 pixels in width. But even that’s not really big by current standards, and Tumblr Photo Posts are notoriously terrible in terms of SEO. You can’t give them proper titles, you can’t add alt text or title text to the images – Tumblr Photo Posts are a huge compromise for anyone wanting, for example, to get their work found on Google.
I’ve suggested on this blog in the past, that you use a third party host to add photos of any size to Tumblr Text Posts, but there was a problem. Because Tumblr will only display directly uploaded media in your followers’ dashboard timelines, all your followers will see when you simply hotlink to an image hosted elsewhere is a grey block. In fact, that applies even if your photo is hosted in another Tumblr post. Tumblr doesn’t say to itself: “Ah, this pic is hosted on Tumblr – it can be displayed in the dashboards”. Unless your photo was uploaded to that specific post, directly from your computer or device, your followers won’t see it. Yes, they can click that grey block to open the image, but will they? Probably not. If they could see the image you uploaded without taking any action, they’d be far more likely to pay attention.
So here’s a method I’ve discovered which not only allows you to host your images with third parties and surmount the 500px size limitation, but also lets your followers see your images in their timelines. As far as I’m aware it should work with any host. I’ve tested it with both Flickr and Postimage, and the browsers I tried were Firefox and Chromium (Chromium is virtually the same as Chrome). For this example I’m going to use the image host Postimage, and the latest version of the Firefox browser. With Postimage, you don’t need to register – you can go straight to the site and upload in seconds.
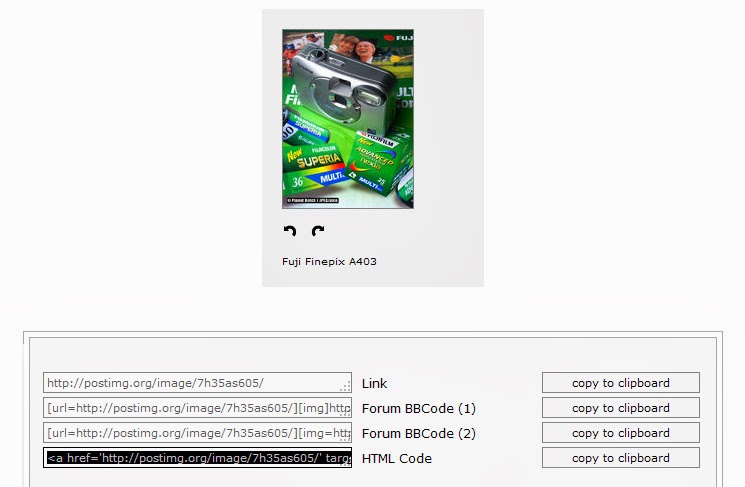
Start by uploading your image to Postimage (or another third party image host of your choice). Then copy the HTML code – shown highlighted in black in the image below…
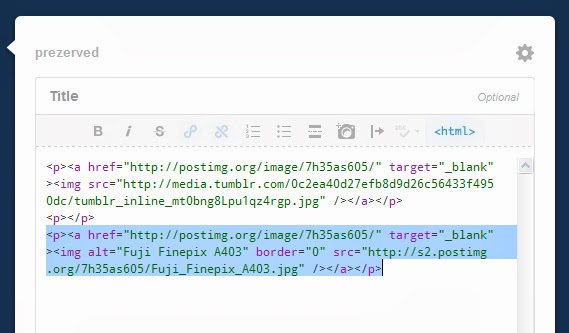
Then head straight to Tumblr and start a new Text Post. Click on the < HTML > toggle near the top right of the post/upload dialogue, and paste in the code you copied from your chosen image host. It should look something like this (I’ve highlighted the < HTML > toggle in yellow)…

Ensure, by the way, that your < HTML > toggle has gone blue before you paste in the code, and that the code displays in its HTML colouring, as above. If the code is standard black and the < HTML > toggle is grey, you've put the code into the Compose window, and that won't work.
Now click on the < HTML > toggle again, and you should see the photo you’ve hotlinked. Mine only displays as a thumbnail because Postimage’s code is a thumbnail code...

But the size at which your photo is displayed at this stage doesn’t matter. If you saved the post now, the image would show on your blog, but not in your followers’ timelines. You need to rectify that. Don’t worry though, there are only two more very quick steps to complete…
You next need to click on the camera icon, and upload the photo directly to the post. The exact same photo you uploaded to the image host. Just upload it as you normally would to Tumblr. Once it’s uploaded, you’ll have two versions of the same picture showing in the display – one beneath the other. They may be different sizes, but again, don’t worry about that.
To complete the job, just click the < HTML > toggle again, and you’ll see two blocks of code, separated by a “<p></p>”… Select the lower block of code, as shown below, and then delete it...
If the trick has worked, Tumblr will be left with an image which displays at the correct size on your blog, shows up in your followers’ timelines, and allows anyone who clicks the photo on your blog to access the original, full-sized file. You can now add your title, body text, tags, custom URL, etc, and make the post. Here's what your followers should see by default. When they click the image it will enlarge, along with any other photos in your post...

You should note that any images included in Tumblr Text Posts, however you upload them, will by default be displayed in timelines as thumbnails. Only Photo Posts display images at full timeline width in the Tumblr dashboard by default. But users WILL click thumbnails which catch their attention – and that’s something they’re just not going to do with a grey blob.
Finally, before you dismiss this method as a little too long-winded to be worth the bother, consider this... Because the workaround links directly to your third party image host, you can use it to promote your Flickr account as well as furthering your interests on Tumblr - all in one action. But the best thing of all about this trick is that if your third party image host goes tits up, for want of a better expression, your Tumblr blog itself is not in any way affected. Tumblr is displaying your direct upload on the blog and in timelines - not a third party hotlink. All the third party host is doing is giving access to the original, full-sized image on demand (i.e. when people click the photo on your blog). If, say, Postimage dies, your image remains fully visible right across Tumblr.
