If you've read Part 1 of this guide on how to give the photos you post on Tumblr a much better chance of being found via Google, it's now time to put the theory into practice and actually do a hotlink. If you haven't read Part 1, which explains why you may have almost no chance of getting your Tumblr Photo Posts displaying prominently on Google, here's the link...
Getting Tumblr Photos Onto Google - Part 1
From here on I'm going to assume you've read Part 1, and are ready to hotlink a photo to a Tumblr Text Post. I'm going to use Photobucket as a third party host for my photo, then hotlink it to Tumblr. The reason I'm using Photobucket is that it has a built-in tool for adding properly-linked HTML alt and description text to your image. The reasons I'm using a third party host at all and not just uploading straight to Tumblr are covered in Part 1. I'm just using a regular free Photobucket account. It's quick to sign up and get started if you don't currently use Photobucket.
The process starts before I even upload my photo to Photobucket. I'm first going to name the JPEG file to represent its content. Here's the actual JPEG. It's a photo of an old advertisement board or sign for the Evening Mail newspaper, which I took in the Birmingham suburb of Rubery, in August 2003. The newspaper has since been renamed the Birmingham Mail, and these signs have vanished, so there's some local interest in the image.
So I've actually called the JPEG Birmingham Evening Mail Sign Rubery August 2003.jpg. UPDATE: Upon scrutinising this example I realised that Photobucket takes the spaces out of the JPEG name when you upload. For this reason I'd suggest using hyphens to separate the words: Birmingham-Evening-Mail-Sign-Rubery-August-2003.jpg.
The JPEG name does identify the shot, but it's also a series of important keywords, which people interested in finding my photo might be typing into Google. The city is there, the suburb name is there, the month, the year - and of course the name of the newspaper. Working out your photo's best keywords is something worth taking a little time over. The better you describe your photo, right through the process, the more chance it has of being found in searches. I'm sure you'll find plenty of arguments as to whether the JPEG name really matters to search engines. I believe it does, but even if it doesn't, search algorithms can change at any time. At least if you've used your descriptive keywords in the JPEG name, your upload is 'futureproof'.
I'm now going to upload my JPEG to Photobucket. Once I've uploaded, I can scroll down slightly and find the dialogue box which is shown below. You can click any of these screen captures to see them at larger size...
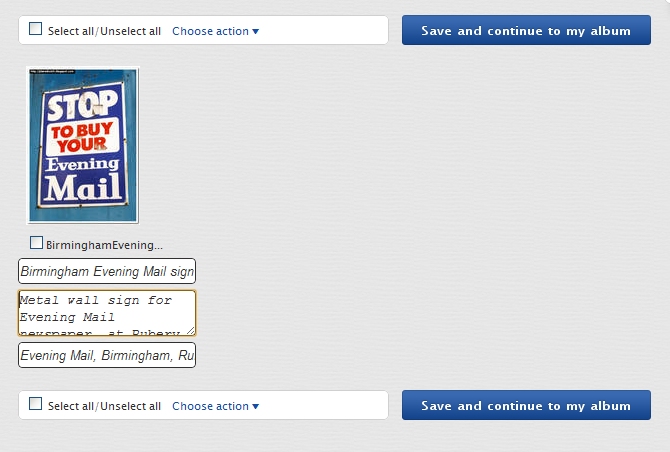
Beneath the photo thumbnail there are three text entry boxes. The top two allow you to add text which will be carried over to your blog when you hotlink, and which will therefore potentially help people find the photo on your blog page, via Google. The bottom box is for tags. These are not carried over onto your blog, so they'll only help people find your photo on Photobucket.
This opens up a new issue. Whether or not you want people to find your photo on Photobucket. If you do allow people to find your photo on Photobucket, it's highly possible that your Photobucket account will outrank your Tumblr blog in Google Image Search. If that's the case, then when people click your highest-placed thumbnail after searching Google Images, they'll be going to your Photobucket album, and not to your blog.
If you're happy with that, great. But if, for example, you've monetised your Tumblr blog with adverts, then you'll be wanting people to visit your blog - not Photobucket. If you only want people to find your photos on your blog, set your Photobucket album to Private. If you just want people to find your photos, full stop, set your Photobucket album to Public. With your album set to Public, the tags you enter into the bottom text box will have a bearing. With your album set to Private, the tags will do nothing, so there's no point in entering any unless you feel you might Publish your album on Photobucket at a later date.
The top text box is for your main alt text. For my photo I've entered: Birmingham Evening Mail sign. The middle text box is for your description. This will augment the alt text when you hotlink your photo. I've used the description: Metal wall sign for Evening Mail newspaper, at Rubery, Birmingham, August 2003. Be clear and use your keywords, but don't add so much text that the message becomes too vague and diluted for Google to pick up upon.
Once you've filled in your text, it's a simple process to hotlink your photo to Tumblr. Click Save and continue to my album, then hover over your photo within your Photobucket album. This will bring up some lines of code, as shown on the top left in the capture below...
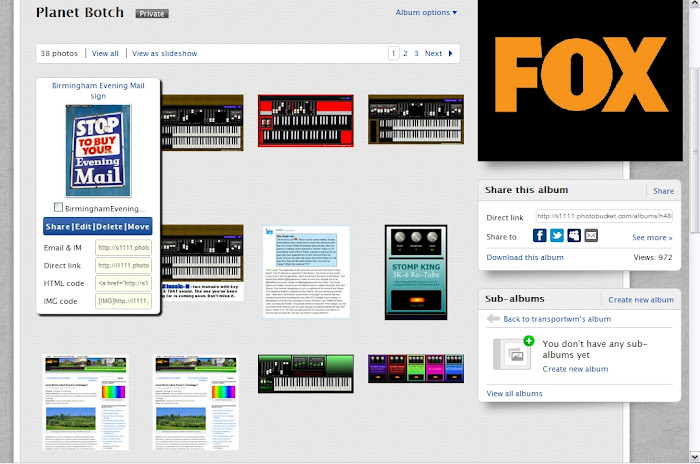
Click the third line down, which is marked HTML code. The code will copy to your clipboard as soon as you click the code box. You're now finished with Photobucket.
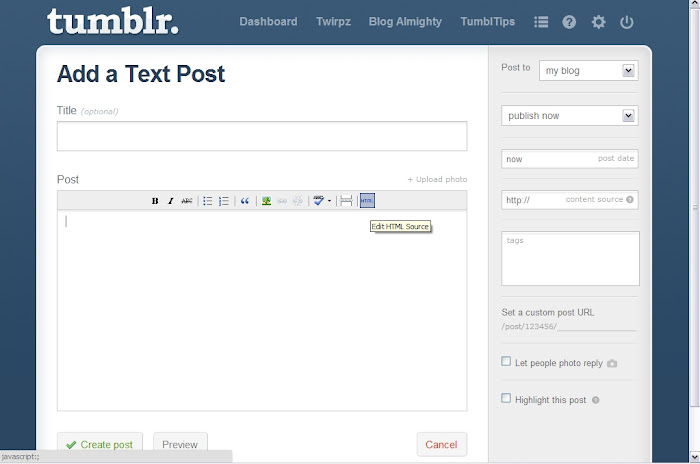
Start a Tumblr Text Post, then click where it says HTML on the editor's toolbar. It's highlighted in the capture below.
You'll now see the HTML editor, which will accept your photo hotlink code from Photobucket (or any other third party image host). Right-click inside the HTML editor and paste in your code. It should look something like this...
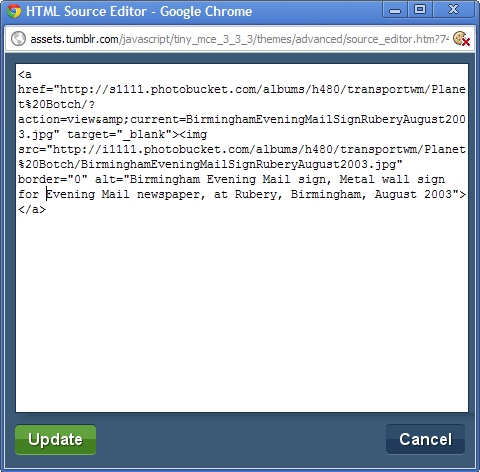
The code may look a bit like gobbledygook, but if you look towards the bottom of the text block, you'll actually see how Photobucket has incorporated the SEO alt text, which includes my keywords. Click on Update, and the HTML editor will close. The photo will now be in your post. If you look at the capture below, you'll see that my photo looks a bit oversized...
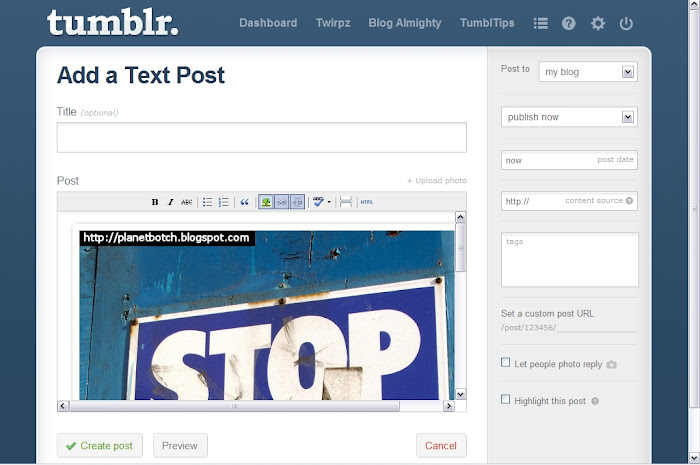
Using Tumblr's editor, you can resize the photo to any size you wish. This is more flexible than a Tumblr Photo Post, which will only display your image at one pre-ordained size. You're not actually editing the picture here by the way - only making it fit into the post. Any visitors wanting to download your photo will still get the original you uploaded. If you do need to resize, click on the photo to select it, then click the little tree symbol in the middle of the toolbar (next to the link symbol). This will bring up the following dialogue box...
Tumblr will automatically fill in the details Photobucket has provided. All you need do is set the width, which goes into the left hand box under the word Dimensions. Type the number of pixels, to match the width of your blog. A good width for the 'Single A' theme I'm using is 570, so that's what I've typed in. If you're not sure of the width, try something between 500 and 600, then click Insert, and then, in the main post editor, click Preview. This will show you how the photo looks in your post. If it's too big or too small, click the tree symbol again and change the width value accordingly. You'll only have to do this trial and error the first time you hotlink. After that, you'll always know what pixel value to use - assuming you don't change your blog theme.
Once the size is right, it's just a matter of adding the final touches. Whatever you do, don't forget to enter the post title. Make sure the title has the main keywords which sum up your photo, and which, ideally, you can imagine someone typing into Google. In the capture below you can see I've entered the title: Birmingham Evening Mail Board at Rubery. I was in two minds about whether to put 'board' or 'sign'. I chose 'board' because it has some ambiguity and I thought it might be searched more often than the word 'sign'...
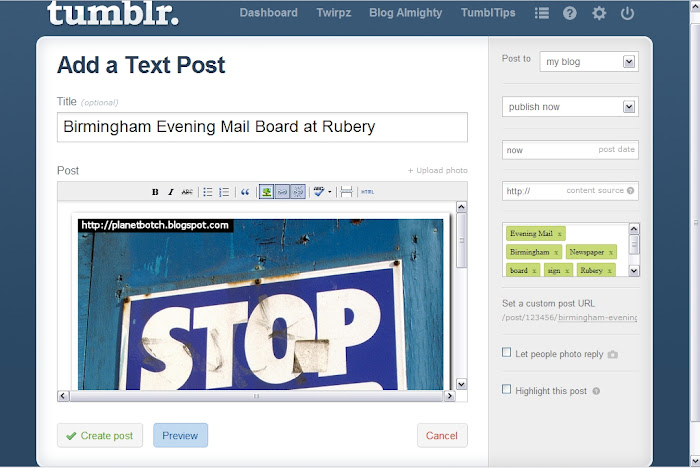
I've also added some tags (in green, on the right), based around the same keywords. And below the tags, I've added a custom post URL. The custom post URL is another very important SEO component. I've used the URL birmingham-evening-mail-sign. You can't use spaces, so the keywords are separated by hyphens.
The final element would be to add some body text. Again, no one but Google knows how Google's search algorithms really work, and I can only go on my own experiences, but my impression is that body text is really important.
In fact, some of the results I've seen on Google suggest to me that it's more important than alt text. So I'd suggest putting in a little detail beneath the photo in the post. I might write...
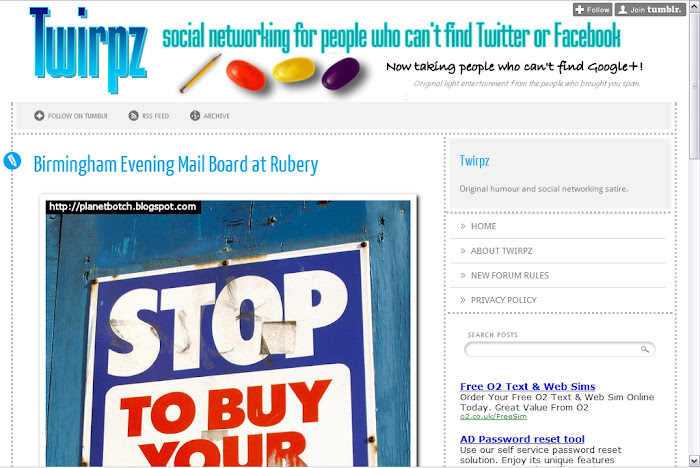
"I found this old Evening Mail sign lingering around in Rubery, south Birmingham, in the summer of 2003. These metal promo boards were found outside newsagents across the city of Birmingham in the 1990s. But by this time in the early noughties, had become quite an unusual sight. The Evening Mail newspaper subsequently became the Birmingham Mail, making it inevitable that any remaining Evening Mail boards or signs would disappear."The more detail you add in the body text, the more interested Google is likely to be in the post. Use original wording though. If you copy your text from elsewhere on the web, then as well as potentially breaching copyright, you'll most probably find Google considers your post in a much dimmer light. Also, whilst you can upload a number of photos to a single post, I've found this can dilute the message and confuse Google. My best results have come from putting a single image in a post, with the title referencing the content of the photo, and the more (relevant) main body text the better. Anyway, here's how the example hotlinked image looks on a Tumblr blog...
Whilst this does seem like a lot of hassle, once you've done it a few times and got used to it, it's only a few minutes' work per post. For some people, that's a long time, and of course this doesn't guarantee that your photo will get into a prominent position on Google Image Search. Your blog will need to establish a bit of status with Google, and that means regularly adding original content, avoiding 'secondhand content', and getting yourself some backlinks from other sites. But at least in making sure Google knows what your photo is all about, you're set up to take full advantage of any status your blog does acquire.
Tumblr users might also be interested in...


